campervanstuff.com
Order
online - or call 01759 304561

campervanstuff.com |
|
|
|||||||||||||
Secure Payments |
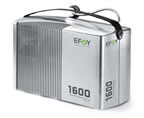
Installing our Efoy 1600
Getting startedThe installation instructions which were provided with our Efoy 1600 are a model of clarity and thoroughness. The pack comes with separate booklets for a number of languages including English and there is a separate user manual and installation manual. We took care to read through the manual before starting; this would help to determine suitable locations in the vehicle but in our case this was already predetermined because there was only one possible place left where it could go in our small high-top campervan. However, we still had to decide on the finer points of positioning the unit, bearing in mind important stipulations in the instructions. Our locationThe bottom of a wardrobe (sorry, the wardrobe) has been home for our Honda EU10i generator; this was to be replaced by the Efoy; the two are in fact a very similar size although additional space is needed alongside the Efoy for the fuel cartridge; and the Efoy also needs extra space around it to accommodate the length of 10cm-diameter ducting which is used to carry warm air out of the Efoy's enclosure. A plus for the Efoy though is that its weight is not much more than half that of the Honda - 7.3kg against 13kg . The essential requirements for the location are quite straightforward:
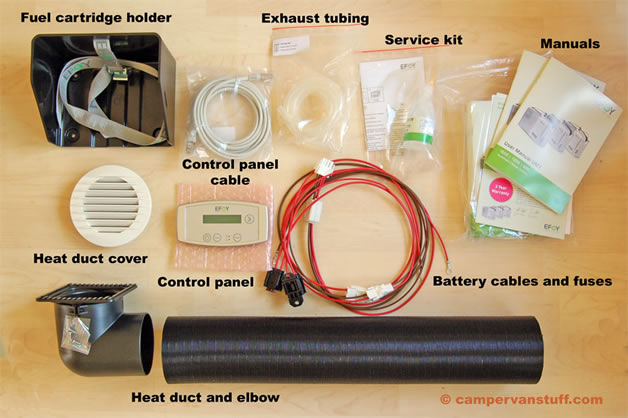
Our space was nice and level but as an enclosed space it was essential to vent the heat away and there was very little room for the vent ducting; we would also have to drill some frightenly large holes - 10cm plus - into the wardrobe side and it would be horribly obvious in the campervan's interior if we made a botch job of that. And most worryingly - we had to find a way to get the exhaust tube vented to the outside and we were reluctant to drill holes through the vehicle's steel bodywork or floor, particularly since the cramped, hidden spaces would make it impossible to be sure we weren't going to drill through something vital. We had also noted in the manual that although the tube provided is 1.5 metres long, it should be kept to no more than .5m for winter use, to prevent condensate from freezing. The electrical connections were inevitably going to be a pain for us: with the battery on one side of the vehicle and the wardrobe on the other, and no possibility of running the wires under floor or outside, they were going to have to be fished through tiny gaps behind various fixtures and the sides of the vehicle. The battery itself, buried deep under the furniture, was already festooned with add-ons, including heavy-duty cabling for the Victron inverter-charger , and connections for the Victron battery monitor and solar panel. But this aspect of the installation, though tedious and holding the promise of body contortions and a very sore back afterwards, did not particularly worry us; we've got quite inured to it after various earlier installations. So how did it go?In fact the whole installation went very smoothly, at least regarding all the Efoy components and instructions. Any difficulties were due to our limited options for positioning and routing and the lack of working space. First job, as already described, was to read the installation manual; next job was to look at the components that came with the Efoy so that we could relate them to the task ahead. Our photo and labels give you a preview, should you be considering an Efoy. Not shown is the flat mounting tray, with securing belt, for the fuel cell itself. This is packed separately in the box, strapped to the fuel cell.
The finer points of our position..The photo below shows how we managed to position our Efoy so that it met the installation requirements:
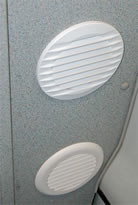
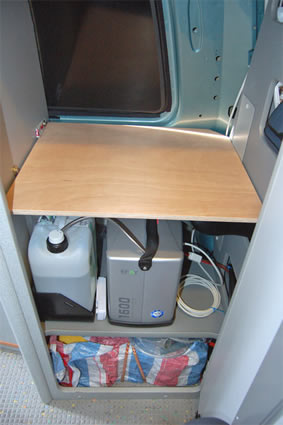
The fuel cell (note that it is belted down in its tray which is screwed to the floor) is placed as close as possible to the right while still leaving just enough room for the elbow to be attached to the warm air outlet; the duct is attached to the elbow and is then bent through a small storage 'bin' (now I need a new place to keep my underpants). In the wall of the bin a 10cm hole was drilled and the duct fitted into it so that it vents outside the wardrobe; the hole is protected by the supplied vent cover - the upper vent in the picture below. The lower cover (OK, not a match - it's by courtesy of Marley from B&Q) has been fitted over a second 10cm hole which serves as an intake for cool air, via the lower 'bin' (which formerly housed my socks.... ). This was about the scariest part of the whole installation: a hole saw of this size demands very careful control of the electric drill - better after practising on some scap plywood - because a slip could end up with some very nasty scarring of our lovely interior. As it happened, halfway through the first hole, the hole saw suddenly bit hard into the material and jammed, causing the drill to be nearly wrenched from the hands. Trembling hands made ready to continue: but the drill was dead. Subsequent checks that the drill and extension leads were plugged in firmly found no fault. It transpired that, at such a critical moment, the fuse in the drill plug had blown; as the hole saw slowed it was unable to cut through the wood fibres and jammed leaving the remaining energy in the rotating mass to try to turn the drill instead.
A couple of points worth noting about the vent positioning: the heat vent emerges in the toilet compartment which is good for two reasons: it provides a small amount of warm air there; and the Efoy makes a slight noise which probably tends to escape via the vent but this is minimised because we can close the toilet door. It could be considered a disadvantage to have the heat ducted into the interior generally - rather than to the exterior - since this might not be desirable in very hot weather. But in our vehicle it would be very difficult to make a 10cm hole to the exterior and besides most of the time we seem to be in cooler climes; yep, the UK. In any case we can always open the toilet window which would soon get rid of the gentle heat from the Efoy. Although there appears to be plenty of free space to the left of the fuel cells, in fact there was not enough room to turn the cartridge holder through ninety degrees, which would have allowed the use of 10 litre cartridges. So we are restricted to 5 litre cartridges but there's room behind for a spare; and another spare goes in the very lowest compartment which is beneath the Efoy. The thin translucent exhaust tube - which incidentally is made of silicone not pvc - can be seen running from its connection at the top right of the fuel cell; it drops down smoothly to an exit point which - a miracle - was already present within the chassis construction and was covered by a rubber grommet which, having been removed and had a 10mm hole drilled in it, was replaced and provide a perfect exit and seal for the Efoy tube. Even more amazingly, the hole is in a position where it is completely protected from spray and dirt and yet is completely outside with no path for the exhaust gases back into the vehicle interior. W still can't believe our luck. Actually it wasn't luck that found it; it was a long time poking about from inside and from beneath the vehicle, with torch and mirror, and mud and grit falling in the eye. But still luck that it was there to be found ... To top it off
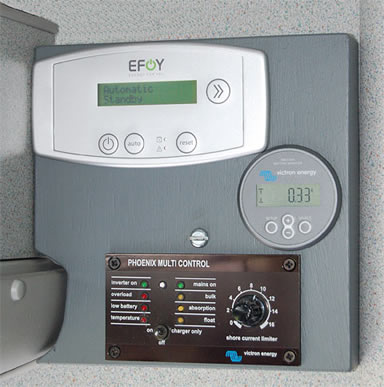
A shelf was added above the Efoy to restore some storage functionality to the wardrobe. The shelf was made high enough to allow the fuel cartridge to be changed without lifting the shelf; on the other hand the shelf can be easily lifted from its rests to allow unimpeded access to the cartridge and fuel cell. Everything under controlThe final part of the installation is the mounting of the control panel. The panel has circuitry protruding behind it so if it is to be mounted flush you have to make a cut-out in the surface you are mounting onto; this requires a pretty large hole. In our case we also had some other control panels which had been installed in a fairly temporary way so we decided to take the opportunity to mount them all together. For this we made a plywood 'instrument panel' with a cut-out for each instrument and enough depth to allow them all to be correctly recessed; after it was painted a suitable colour it all looked very neat. A hole in the bulkhead which formerly accommodated one of the instruments is now behind the panel and provides an opening for the leads to each panel Note that Efoy produce a neat, matching plastic mounting box which allows the control panel to be fixed without having to make any cut-outs. We can supply this optional part. Connecting the control panel is simple; the supplied lead plugs into the panel at one end and into the fuel cell at the other end.
The Efoy control panel mounted with the Victron BMV-600 battery monitor display and the control panel for the Victron Phoenix MultiPlus inverter-charger. Start upWhen all of the installation was complete, we strapped a cartridge into the holder and removed the cap. When the cap is removed the cartridge is still sealed by a valve which only opens when the connector from the fuel cell is screwed down onto the cartridge. It was then time to replace the fuses in the wiring, as mentioned earlier. And then the wiring connector was plugged into the fuel cell. It was late at night, very quiet and dark and cold - and we were startled by the instant buzz and hum which the unit makes on startup; this soon settled down to a much quieter buzz which was further silenced when we closed the door. Everything had gone to plan. We settled back while the Efoy completed its start-up phase, which takes about twenty minutes, before it reaches full output. The output is regulated according to the state of the battery but very soon the control panel was showing a charging rate of just over 5 amps.
|
| |||||||||||
| Copyright enetgy limited 2006 - enetgy.co.uk | |||||||||||||